It’s finally happening: the leaves have changed colors; it’s time for thick socks with your Birkenstocks; and your bed just got 10 times harder to leave in the morning.
As the Northerners from “Game of Thrones” would say, “Winter is coming.”
By now, you have probably already finished binging season two of “Stranger Things” and are looking for another cozy way to spend your time in this chilly season. May I suggest embroidery?
It’s a fun and easy way to keep busy — even as you cry over Eleven and Mike at the winter dance.
To get you started, here are a few basic stitches to use in your embroidery, so you can add your own ironic phrases and quirky designs onto your favorite caps and T-shirts.
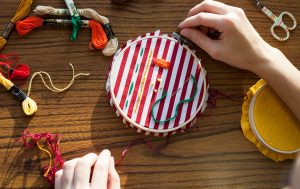
First thing’s first: You need fabric and an embroidery hoop. There are many sizes of embroidery hoops, from very large to itty bitty. The choice is up to you! But I recommend having a 5″ or 6″ hoop for a “standard size.”
You’ll also need embroidery floss and embroidery needles. Regular ol’ needles won’t cut it here because embroidery floss is thicker than regular thread and needs special needles to get the job done. Embroidery floss is composed of multiple strands (six to be exact), so you can utilize all six strands or just a few depending on how thick you want those lines to be.
Threading the needle
Then, you’ll need to thread the needle with the floss of your choosing. A good rule of thumb is to pull about two and a half times the circumference of your hoop. You can always pull more and rethread the needle if you find that you didn’t pull enough the first time.
Threading the needle isn’t as tricky as it seems, but it can be tedious. Wet the end of the thread (licking it is the way the veterans do it) and push the thread through the hole, pull it halfway through and then knot the ends of the thread together to form a loop.
The knot at the end will stop the thread from slipping through your fabric after the first stitch. To set up your hoop and fabric, you start by taking apart the two rings of the hoop, the inner smaller section will go under your fabric, and then you will place the outer ring on top, sandwiching the fabric between the rings. Now you tighten the little screw on top and pull the fabric taught and you are ready to get stitchin’!
1. Running Stitch
This is the most basic stitch and the perfect base point because it’s the good ol’ fashioned, over-under stitch that looks like a dashed line. Just make sure to start from the underside of the fabric to hide the knot, then pull it up through the fabric and push it back through to create a line. These stitches are good basic stitches for creating a shape or “sketching out” your design for other stitches.
2. Backstitch
The backstitch is like the running stitch’s more detailed older sibling. It goes back over the gaps left by a running stitch, turning the dashed line into a continuous line. You start with a running stitch (over-under) but when you come back up through the fabric to go forward over, you actually double back and cover up the gap that the under portion left (hence the name: backstitch). Then you resurface the needle where you started the backstitch and continue. You do this in between every running stitch. This stitch is great for lettering or outlining designs.
3. Satin Stitch
This one is easy. A satin stitch is perfect for covering up small surface areas smoothly. It is essentially just coloring in a blank spot with thread and going back and forth over the area until it is all covered.
Pro-tip: Stick to smaller areas with a satin stitch or the threads could look loose and sloppy. This defeats the “satin” smooth look for which the stitch was named.
4. French Knot
These guys are really cute. The French knot stitch is great for centers of flowers or bubbles or just an overall touch of cuteness to your project. But it can be a two-handed job.
Hold your needle in one hand after pulling it up through the bottom of the fabric right next to where you want the knot to be. With the other hand, wind the floss around the needle. Pro tip: Start by wrapping the floss around twice until you get comfortable with the stitch. Make sure the needle is in front of the floss when you start winding.
Next, while holding the wrapped thread taut, push the needle into the fabric (not through the same hole you pulled the needle up through originally) and ta-da! Cute little knots for whatever you deem necessary.
Those stitches should be enough to get you started on your projects! The best part about embroidery is the total freedom and the ability to multitask (like watching Netflix!) while you stitch. So cuddle up with your hoop and thread, some hot tea/coffee/cocoa and make something cool that is all yours!